In today’s digital age, our computers hold an enormous amount of valuable information — from personal photos and important documents to work projects and financial records. Losing this data can be devastating, whether due to accidental deletion, hardware failure, malware, or a system crash. Thankfully, Windows offers several built-in and third-party solutions to back up and restore your data safely.
In this comprehensive guide, we’ll walk through step-by-step instructions on how to back up and restore your data in Windows, ensuring that your files are always secure and recoverable.
1. Why Backing Up Your Data Is Important
Before diving into the technical steps, it’s crucial to understand why backups matter. Many users underestimate the risk of data loss until it happens. Here are a few common causes:
-
Hardware Failure: Hard drives and SSDs can fail suddenly, especially after years of use.
-
Malware or Ransomware: Viruses can corrupt or encrypt your data.
-
Accidental Deletion: Files can be mistakenly deleted or overwritten.
-
System Crashes or Corruption: Windows updates or software conflicts can lead to system instability.
-
Theft or Physical Damage: Laptops can be lost, stolen, or damaged beyond repair.
Regular backups ensure you can recover quickly and minimize downtime or loss.
2. Understanding Different Types of Backups
Before choosing a backup method, you need to understand the different types of backups available:
-
Full Backup: A complete copy of all your data, including system files. This type takes the most space but is the most comprehensive.
-
Incremental Backup: Saves only the data that has changed since the last backup. It’s faster and uses less storage.
-
Differential Backup: Saves all data changed since the last full backup. It uses more space than incremental but restores faster.
-
System Image Backup: A snapshot of your entire system — Windows, applications, settings, and files — useful for full system recovery.
-
File History Backup: Automatically saves copies of specific files and folders over time, allowing you to restore older versions.
3. Choosing the Right Backup Storage Location
Your backup is only as safe as where it’s stored. Consider these storage options:
-
External Hard Drive: Easy to set up, portable, and ideal for personal use.
-
Network Attached Storage (NAS): Great for multiple devices or small offices.
-
Cloud Storage: Services like OneDrive, Google Drive, or Dropbox automatically sync data online for extra protection.
-
USB Drive: Convenient for small data sets but not ideal for large backups.
-
Backup Server: Suitable for organizations that need centralized and automated backups.
For maximum safety, use the 3-2-1 rule:
-
Keep 3 copies of your data (1 original + 2 backups).
-
Store on 2 different media (e.g., hard drive and cloud).
-
Keep 1 copy off-site (in the cloud or another location).
4. How to Back Up Data Using File History in Windows
File History is one of Windows’ most convenient built-in backup tools. It automatically saves copies of your files so you can restore them later.
Step-by-Step Guide:
-
Connect Your Backup Drive
Plug in an external hard drive or ensure your network drive is available. -
Open File History Settings
-
Go to Settings > Update & Security > Backup.
-
Click Add a drive under Back up using File History.
-
Select your backup drive.
-
-
Turn On File History
Once you choose a drive, toggle Automatically back up my files to “On.” -
Customize Backup Settings
-
Click More options to choose which folders to back up.
-
Add or remove folders as needed.
-
Choose how often backups occur (e.g., every hour, daily, etc.).
-
Set how long to keep backups — from “Until space is needed” to “Forever.”
-
-
Manually Start a Backup (Optional)
Click Back up now to start the first backup manually.
Your files will now be automatically backed up based on your chosen schedule.
5. Restoring Files Using File History
If you accidentally delete or modify a file, File History makes restoring it simple.
Steps to Restore Your Files:
-
Open the Control Panel, then go to System and Security > File History.
-
Click Restore personal files in the left panel.
-
Browse through available backups by date or folder.
-
Select the files or folders you want to restore.
-
Click the Restore button to bring them back to their original location, or right-click and choose Restore to to specify a new location.
This method is ideal for recovering individual files rather than your entire system.
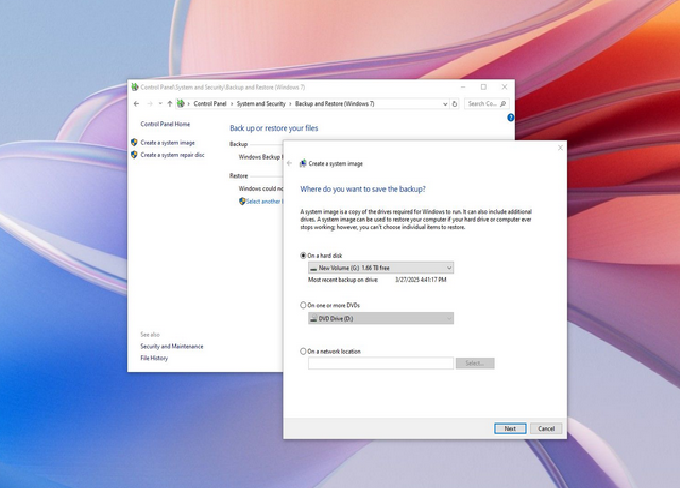
6. Creating a System Image Backup
A System Image is a complete copy of your Windows installation, including system files, applications, settings, and personal data. This backup is invaluable if your system becomes corrupted or your drive fails completely.
How to Create a System Image Backup:
-
Open the Control Panel and navigate to:
System and Security > Backup and Restore (Windows 7).
(Despite the name, it still works on Windows 10 and 11.) -
On the left, click Create a system image.
-
Choose where to save the backup:
-
On a hard disk
-
On one or more DVDs
-
On a network location
-
-
Select the drives you want to include in the image (the system drive is selected by default).
-
Click Start backup to begin.
Depending on the size of your data, this process can take anywhere from a few minutes to a few hours.
7. Restoring from a System Image Backup
If your computer fails or becomes unbootable, you can restore it from a system image.
Steps to Restore Using System Image:
-
Insert Your Recovery Media or Bootable Drive
-
Use a Windows installation disc or a recovery USB drive.
-
-
Boot from the Recovery Media
-
Restart your computer and enter BIOS/UEFI settings (usually by pressing F2, F12, ESC, or DEL).
-
Select the recovery media as the first boot option.
-
-
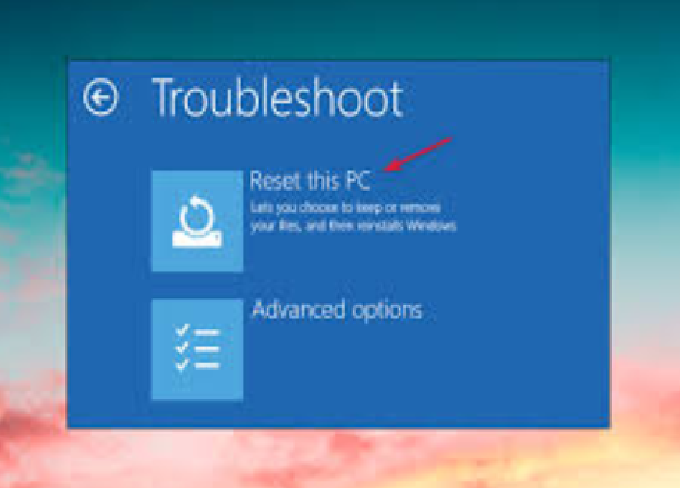
Choose “Repair Your Computer”
-
Go to Troubleshoot > Advanced options > System Image Recovery.
-
-
Select the System Image Backup
-
Choose the latest system image available.
-
-
Start the Restoration
-
Confirm your selection and click Next to restore your system.
-
Once complete, your entire system will be returned to the state it was in when the backup was created.
8. Using OneDrive for Cloud Backups
Microsoft’s OneDrive is integrated into Windows, offering seamless cloud storage for your files. It automatically syncs your documents, photos, and desktop data with the cloud.
How to Set Up OneDrive Backup:
-
Sign in with your Microsoft account.
-
Click the OneDrive icon in the taskbar.
-
Go to Settings > Backup > Manage Backup.
-
Choose which folders (Desktop, Documents, Pictures) to back up.
-
Click Start Backup to begin uploading files to the cloud.
Restoring Files from OneDrive:
-
Log into OneDrive.com or use the OneDrive folder in File Explorer.
-
Locate the deleted or previous version of the file.
-
Right-click and choose Restore or Download to recover it.
OneDrive also provides Version History, allowing you to restore older file versions in case of accidental changes.
9. Creating Automatic Backups with Windows Backup
Windows also includes the Backup and Restore (Windows 7) utility, which supports automatic scheduled backups.
Steps to Create an Automatic Backup:
-
Open Control Panel > System and Security > Backup and Restore (Windows 7).
-
Click Set up backup.
-
Select a destination (external drive or network location).
-
Choose Let Windows choose (recommended) or Let me choose to customize folders.
-
Set a schedule (daily, weekly, etc.).
-
Click Save settings and run backup.
Once configured, Windows will automatically create regular backups according to your schedule.
10. How to Restore Files from Windows Backup
Steps to Restore Data:
-
Open Backup and Restore (Windows 7) from the Control Panel.
-
Click Restore my files or Restore all users’ files.
-
Browse or search for the files you want to restore.
-
Choose where to restore them — their original location or a new folder.
This feature is excellent for restoring larger sets of files or recovering from a recent system issue.
11. Using Third-Party Backup Software
While Windows tools are powerful, some users prefer more advanced third-party options for added control and automation. Popular free tools include:
-
Macrium Reflect Free: Great for creating disk images and cloning drives.
-
AOMEI Backupper Standard: Simple interface with both file and system backup options.
-
EaseUS Todo Backup Free: User-friendly tool with cloud integration and incremental backups.
-
Paragon Backup & Recovery: Offers flexible scheduling and partition-level backups.
These tools often provide features like encryption, compression, and off-site backup options that go beyond what Windows offers by default.
12. Tips for Effective Backup Management
To keep your backups reliable and organized, follow these best practices:
-
Automate Regular Backups: Set up scheduled backups so you never forget.
-
Label and Date Backups: Helps track different versions over time.
-
Test Your Backups: Occasionally restore files to confirm they work correctly.
-
Encrypt Sensitive Data: Protect backups from unauthorized access.
-
Monitor Storage Space: Delete old or redundant backups to free up space.
-
Keep Off-Site Copies: Store at least one copy outside your home or office.
13. Restoring Data After a System Crash
If Windows fails to boot, you can still recover your files.
Option 1: Use Windows Recovery Environment (WinRE)
-
Boot from a Windows installation USB.
-
Select Repair your computer > Troubleshoot > System Restore or System Image Recovery.
Option 2: Access Files via Command Prompt
-
In WinRE, choose Troubleshoot > Advanced Options > Command Prompt.
-
Copy files from the damaged system to an external drive manually.
Option 3: Use Bootable Backup Software
-
Tools like Macrium Reflect allow you to create a bootable recovery environment to restore or clone your drives safely.
14. How to Restore Previous Versions of Files
Windows offers an additional safety feature called File History Versions, which allows you to roll back to older versions of files without restoring the whole backup.
Steps:
-
Right-click the file or folder.
-
Select Properties > Previous Versions.
-
Choose the version you want to restore.
-
Click Restore or Open to preview it first.
This feature is useful for undoing accidental changes without losing other data.
15. Troubleshooting Backup and Restore Issues
Common problems can sometimes occur during backup or restoration. Here’s how to handle them:
-
Backup Drive Not Recognized: Ensure it’s properly connected and formatted as NTFS.
-
Insufficient Space: Delete old backups or use a larger drive.
-
Backup Fails to Start: Run the backup tool as an administrator or check Windows Update for bug fixes.
-
Restoration Errors: Try restoring from another backup or verify file integrity.
Keeping Windows and your backup software updated often resolves most issues.
16. Final Thoughts: Keep Your Data Safe
Backing up your data isn’t just a precaution — it’s a necessity. With so much of our personal and professional life stored digitally, having a reliable backup plan can save you from stress, time loss, and even financial damage.
By following this guide, you now know:
-
How to use File History for automatic file backups.
-
How to create and restore system images.
-
How to use OneDrive for cloud protection.
-
How to automate and manage your backups efficiently.